
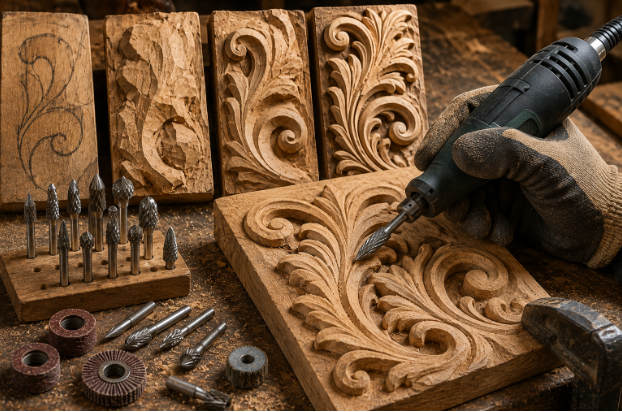
Wood carving has evolved significantly over the years, combining traditional craftsmanship with modern power tools to make carving faster, more precise, and accessible to hobbyists and professionals alike. While hand chisels and gouges remain valuable, rotary carving tools have transformed how intricate designs, sculptures, relief carvings, and decorative projects are created.
Using rotary carving tools for wood allows carvers to remove material efficiently while maintaining excellent control over fine details. With interchangeable burrs, cutters, and sanding accessories, rotary tools can handle everything from rough shaping to delicate finishing work. Whether you’re creating decorative signs, wooden sculptures, bowls, or furniture accents, understanding how these tools work can help improve both efficiency and carving quality. Rotary tools are widely used for carving, engraving, sanding, shaping, and detailing wood thanks to their versatility and interchangeable accessories.
What Are Rotary Carving Tools?
Rotary carving tools for wood are handheld power tools that rotate specialized cutting accessories at high speeds. Different bits allow users to carve, engrave, shape, hollow, smooth, and finish wooden surfaces with precision.
Unlike traditional hand carving tools, rotary tools rely on motor-driven rotation to remove material, reducing physical effort while allowing greater flexibility for detailed work.
Common accessories include:
- Carbide burrs
- High-speed cutters
- Diamond burrs
- Sanding drums
- Grinding stones
- Polishing wheels
Selecting the correct accessory for each stage of carving helps improve both accuracy and surface finish.
Why Rotary Carving Tools Are Popular
Many woodworkers prefer rotary carving tools for wood because they combine versatility with precision.
Some of their biggest advantages include:
- Faster material removal
- Better control for intricate designs
- Ability to work on curved surfaces
- Reduced physical effort
- Compatibility with multiple carving accessories
- Suitable for beginners and experienced woodworkers alike
Their compact design also makes them useful for projects that require detailed work in tight spaces.
Essential Types of Rotary Carving Bits
Different carving stages require different cutting accessories.
Carbide Burrs
Carbide burrs are commonly used for rapid material removal during rough shaping. They remain sharp for extended periods and perform well on both softwoods and hardwoods.
Ball Burrs
Ball-shaped burrs create rounded grooves, texture, and smooth contours that work well for decorative carvings.
Flame Burrs
Flame-shaped cutters are useful for detailed carving, tight corners, and refining complex shapes.
Cylinder Cutters
Cylinder bits help create straight channels, flat surfaces, and defined edges.
Sanding Drums
After carving is complete, sanding drums smooth tool marks and prepare the surface for finishing. Experts generally recommend progressing through multiple grit levels for a smoother finish.
Choosing the Right Wood
The type of wood significantly affects carving performance.
Popular choices include:
- Basswood
- Butternut
- Pine
- Cedar
- Walnut
- Cherry
Beginners often start with basswood because its fine, even grain makes carving easier and reduces the likelihood of splitting. Dense hardwoods may require more powerful rotary tools and sharper carbide burrs.
Basic Carving Process
Learning a structured workflow helps improve carving results.
Rough Shaping
The first stage removes excess material to establish the basic form of the project.
Refining the Shape
Smaller burrs gradually define curves, contours, and design elements while maintaining control.
Detail Carving
Fine accessories create textures, facial features, lettering, decorative patterns, and intricate designs.
Sanding
Progressively finer sanding drums remove tool marks and smooth the carved surface before finishing.
Finishing
Depending on the project, wood can be stained, painted, waxed, or sealed to protect the finished carving. Moving through rough shaping, detailing, sanding, and finishing is a standard workflow used by many wood carvers.
Safety Tips When Using Rotary Carving Tools
Safe operation should always be a priority.
Recommended precautions include:
- Wear safety glasses.
- Use a dust mask or respirator when carving.
- Secure the workpiece with clamps.
- Keep both hands steady while operating the tool.
- Allow the cutting bit to do the work without excessive pressure.
- Choose the correct speed for the material.
- Maintain sharp, undamaged accessories.
Proper dust collection or ventilation is also recommended because wood carving generates fine airborne dust.
Common Mistakes to Avoid
Even experienced woodworkers can encounter avoidable issues.
Some common mistakes include:
- Applying too much pressure
- Using the wrong carving bit
- Running the tool at excessive speed
- Ignoring wood grain direction
- Skipping sanding stages
- Working with dull accessories
Taking a gradual approach produces cleaner cuts and reduces the chance of damaging the workpiece.
Tips for Better Carving Results
To get the most from rotary carving tools for wood, keep these best practices in mind:
- Practice on scrap wood before starting detailed projects.
- Match the bit shape to the desired carving effect.
- Work in multiple light passes rather than removing too much material at once.
- Keep accessories clean and well maintained.
- Use variable speed settings based on the wood species and carving stage.
- Finish with progressively finer abrasives for a professional appearance.
Developing good technique over time leads to smoother finishes and greater carving accuracy.
Conclusion
Whether you’re creating decorative artwork, furniture accents, sculptures, or personalized gifts, rotary carving tools for wood provide the versatility and precision needed for a wide range of woodworking projects. As your skills grow, investing time in learning different wood carving tools rotary techniques can further expand your creative possibilities and improve the quality of every finished project. By selecting the right bits, following safe operating practices, and progressing through each carving stage methodically, both beginners and experienced woodworkers can achieve impressive results.
